Add users to a company in Mailvio
You can invite other people to become members of your company, along with defining which features and areas they have access to.
It's really easy to add new users to your company. Here's how it's done.
Step 1: Before you begin, you must make sure you are logged in to the MAILVIO control panel.
Step 2: Once logged in to the MAILVIO control panel, click your name at the top right of the site, and then click "Company Profile".
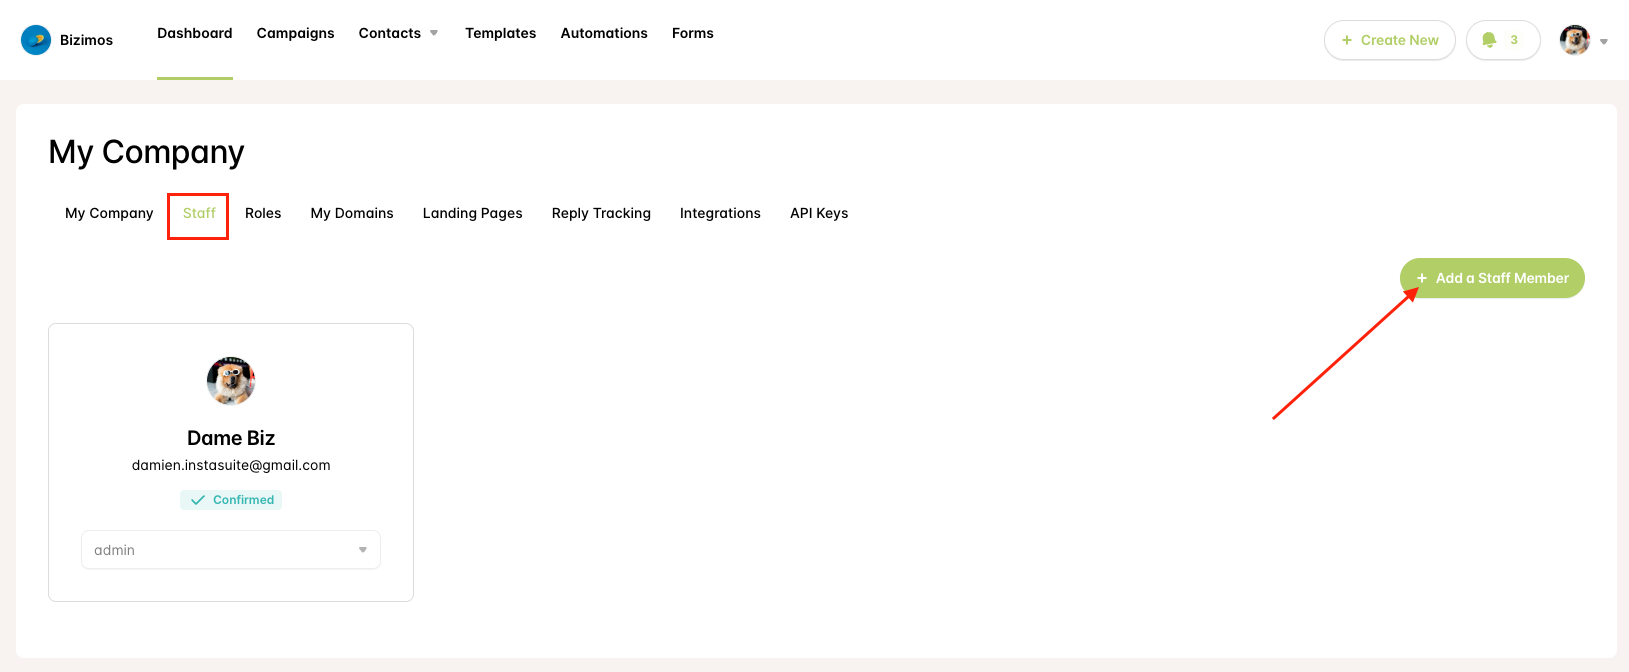
Step 3: Select the STAFF link from the sub-navigation along the top of the page...
Step 4: Click the "ADD A STAFF MEMBER" Button located towards the top right of the page.
Step 5: A "drawer" will slide onto the page, asking you to enter the email address of the staff member you would like to invite. Enter the person's email address who you would like to invite to have access to your company. Finally, press the "Continue" button to finish adding the staff member.
Step 6: An email will be sent to the staff member which tells them you have invited them to your company and provides a link to click. Once clicked the staff member will be a member of your company and will be able to switch to the company whenever they log in.
Permissions:
Once a staff member has been added, you can choose the sections of the control panel they have access to by selecting their "Role".
By default, we automatically create two roles for every company.
- Admin. This role effectively gives users complete control over a company account. They can access all features and settings.
- Standard. This role gives users access to all features but restricts the ability to view or modify any of the company settings. For example, they can't see or alter staff, payments, roles, etc.
You can create your own roles by clicking the "Roles" tab located towards the top of the page.
You can create as many roles as you wish, and you can assign different permissions to each role as you see fit.
In the above example, we have created a new "Accounts" role where we have turned off access to all features, except for allowing them to read-only access to the "Company Account" area. This would be useful to give an accounts department so they could log in and access invoices.
Related Articles
How to add a group in Mailvio
Adding a New Group Groups are used to contain and organize subscribers. You can only add subscribers once you have added at least one group. Adding a new group is very simple. Step 1: Before you begin, you must make sure you are logged in to the ...Update your company profile in Mailvio
You can update your company profile like this... Step 1: Before you begin, you must make sure you are logged in to the MAILVIO control panel. Step 2: Once logged in to the MAILVIO control panel, click your name at the top right of the site, and then ...How to add your domain in Mailvio
Using your own domains when sending emails is a great way to both improve deliverability and look more professional at the same time. There are three types of domains that are used when sending an email. 1. Email Domains By email domains, we mean the ...Add your team members to your Mailvio account
Step 1: Click on your profile name and go to Company Profile. Step 2: Click on the Staf tab then click the Add A Staff Member button. Step 3: Simply add their email address then click Continue. Step 4: You can choose the role of that member, either ...Welcome to Mailvio
Welcome to Mailvio! We focus on your email deliverability. We're sure you're super excited to dive into Mailvio, but we recommend moving step by step. We've created a structured path for you to follow to get the most out of it. Simply click on any ...